Scripting
Scripting
In Display MICRESS it is possible to automate every user action with scripting. This means that every action the user does with the mouse or keyboard is reproducible with a script without human interaction. The user is able to write a script within Display MICRESS or in any text editor. Additionally, it is possible to automatically generate scripts from the user’s actions within the program; this process is called recording. Scripts can be executed from the internal script editor via hotkeys or at the startup of Display MICRESS.
Writing scripts
As script files are plain text files they can be written in any text editor. However, it is recommended to use the internal editor within Display MICRESS to benefit from syntax highlighting and command references. The editor, called scripting console, can be invoked via Show scripting console in the scripting menu.
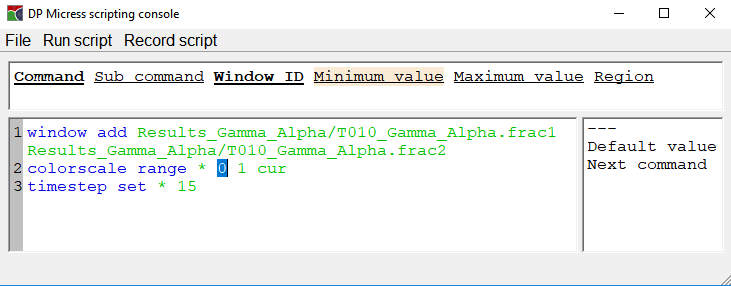
The editor consists of three sections. The lower left section is the editor area where the user is able to write text. The area above the editor area, called information area, is used to display information about the current command. Every command is defined in a single line and consists of a main command, a sub command and command arguments. While the user enters his commands, the information area will display what the user has to enter to get a valid command. In practice this means that as soon as the command and sub command have been entered, a list of expected arguments will be shown. Some arguments are optional, they will be written in normal text style, whereas required arguments will be written in bold. The yellow background shows in which command argument the text cursor is currently located. To the right side of the editor area the choice area is located. In this area all possible keyword which the user can currently write are displayed. These keywords can be inserted into the text by double clicking them or by pressing the tab key during editing in the editor area. If multiple keywords are available while pressing the tab key, only the leading characters which are equal in all possible keywords will be inserted. All valid keywords are written in lower cases. If a keyword begins with an upper case character, this indicates that the user has to replace this keyword by its meaning. An example would be 'Integer' where the user has to enter an integer number.
Commands are separated by newlines and command arguments are separated by spaces. If an argument needs to contain spaces it can be enclosed by quotation marks. If the first character in a line is '#', the line is considered to be a comment and is thus ignored during execution.
For easier reading of the command lines they are highlighted according to their syntax. Valid commands will be written in blue, valid arguments in green and invalid text will be written in black. If a command line is invalid its background color will be red, valid commands will have a white background color.
As soon as a command line is valid, it can be executed. There are four ways of execution:
- Execute current line, meaning the line where the text curser is located
- Execute all lines from top to bottom
- Execute all lines from the top to the current line, including the current line
- Execute all lines from the current line to the bottom, including the current line
The executions can be inherited via the Run script menu or via hotkeys (see Run script menu entry).
During execution, the background color in the line number area (left to the editor area) will indicate a line’s execution status. Gray lines are pending, blue lines are currently executing, green lines have been executed successfully and red lines have executed with errors. If a line executed with errors the execution of all other lines will be stopped. Lines will be executed one after another and it is guaranteed that the previous command’s result is available to the next command. For example a newly opened file can be safely referenced to in the next command line.
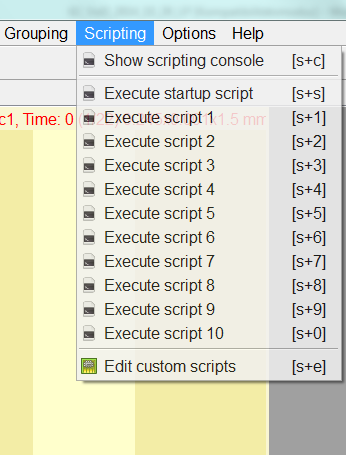
The scripting menu includes several slots to hold scripts and execute it, especially a startup script slot which will be executed at each DP_MICRESS startup. These slots and the containing scripts can be modified by Edit custom scripts. Do not save these dedicated scripts with another file name because otherwise the connection to the execution slots will be lost (see also section Default scripts, etc.).
Recording scripts
It can be very helpful to not write every single command of a longer command chain, but just let the scripting console record what the user does. To enable this feature recording has to be started via the “Record script” menu in the scripting console. Once recording was started the scripting console will be appended with command lines as soon as the user performs an action within Display MICRESS. Generated scripts should always be read and corrected prior to using them, because some generated command lines can be needless. For example if three EDX points are placed with the mouse, three commands will be generated where only the last one would be needed. Some of the actions are not plotted, for example the line scan export as a table.
After recording the script, be sure to stop recording via the Record script menu. Running a script during recording can potentially produce infinite loops because the executed commands will be added to the script again.
Default scripts, startup script and command line use
One way of executing a script is to load it in the scripting console and execute it. For scripts which are used very often there is a more convenient method: Custom scripts. There are ten custom scripts which can be executed via the Display MICRESS scripting menu or by a simple hotkey combination. To edit these scripts use Edit custom scripts in the scripting menu and select one of the custom scripts. This essentially opens a scripting console with an opened file which can be edited and saved. Please don’t use the “Save as” feature, because this would save the custom script as a new and unrelated script. The custom scripts will automatically be saved in the user’s home directory and are thus personalized for every user. The first line of the script file contains a comment where the user can enter a name for the script; this name will appear in the scripting menu.
There is an eleventh custom scripted called Startup script. The startup script behaves like any other custom script with the addition that it will be run automatically after every startup of Display MICRESS. If the user passed filenames to Display MICRESS at startup, it is guaranteed that the files will be loaded before the startup script is executed.
The last two ways of running a script file are command line arguments. When starting Display MICRESS the user can add the keyword --script, followed by the filename of a script file. This will result in the script being loaded and run after all data files have been loaded and after the startup script was executed. The --script keyword cannot be followed by multiple script files but it is possible to use the keyword multiple times. If this is done the scripts will be executed in the order in which they were specified. The second command line argument for script execution is --console. This argument behaves like --script, with the exception that the graphical user interface will be created but will stay minimized and thus in the background. It is recommended to end scripts with the quit command if they are invoked with --console, as this will create a behavior where Display MICRESS starts up, executes a script and then closes itself without any user interference.
** Usage from the command line
Usage of Diplay MICRESS
  DP_MICRESS [FILE ...] [OPTION ...]
Options:
  --help or -h                Show this help
  --vector FILE1 FILE2 FILE3  Open and display the files, in a fourth window show file 1 with file 2 as x vector and file 3 as y vector
  --script FILE               After loading all files, load and execute script file
  --console FILE              Like --script, but keeps main window minimized during script execution
Script language definition
Most of the scripting commands consist of a main command, a sub command and some arguments. All performable actions can be grouped in multiple groups which are defined by the main command, meaning that actions which are related will share a main command. This grouping was adapted for the following sub chapters. There exist two commands, which don’t need any sub command or argument.
| Command | Explanation |
|---|---|
| reset | Reset the application as if it was closed and opened again. All open files and groups will be closed. |
| quit | Quit the application. All unsaved data will be lost. |
Some arguments are optional. All optional arguments can be replaced by the '*' sign, which means that the default value of the argument will be used. If a command ends with optional arguments the trailing '*' signs can be omitted.
Some arguments expect a list of integer numbers. This list must contain comma separated numbers without spaces. Dashes can be used to express series of numbers. An example list is '1,2,3-5' meaning 1, 2, 3, 4 and 5.
Window commands
All following sub commands need to be prefixed with the window command and apply on all active windows of the current group, if not specified differently. Some sub commands require window IDs. These can be specified directly by referencing the number shown at the beginning of the header of a window. Another way is to use negative IDs to reference the newest windows. For example -1 would be the newest window, -2 the second newest window, and so on. A window is newer than another if its ID is larger. The same holds for group IDs.
| Sub Command | Explanation | Arguments |
|---|---|---|
| add | Open a dataset and display it in a new window. If one dataset is opened, it will be added to the current group, for multiple datasets a new group will be created. The file name argument can be repeated to open multiple files. | File name: A relative or absolute path to a dataset file |
| tile | Tile windows. With arguments it is possible to sort the windows according to their windows ID. If not all windows IDs are given, the rest will be sorted from low to high numbers. | Sorted, optional: true or false, to enable or disable sorting. Default is false. Window ID, optional: Specify which windows should be at the first position. This argument can be repeated to specify the ID for the second, third, … position. |
| cascade | Cascade windows | |
| fit | Fit the windows sizes to their contents, reducing the amount of unused space. | |
| mainfit | Fit the main windows to the current group’s content such that all windows are visible and no empty space is visible. | |
| size | Set window sizes to a specific size in pixel. The specified size will apply on the rendered dataset, meaning that with annotations, the actual window size will be larger. | Width (pixel) Height (pixel) |
| move | Move a window to a certain position inside the group. The position is relative to the upper left corner of the group. | Window ID Horizontal position (pixel) Vertical position (pixel) |
| arrange | Specify how “tile” should arrange the windows. It is possible to specify a fixed row count, a fixed column count or use automatic mode. Count has to be specified for “rows” and “columns”, for “auto” the count will be ignored. | Mode: auto, rows or columns Count, optional |
| active | Set active state of windows. | Window ID, optional: If specified only one window will be affected, otherwise ('*') all windows of the current group will be affected Active: true or false, default is true |
| others | Set active state of all windows of the current group but the specified one. | Window ID Active: true or false, default is true |
| group | Move a window to a specific group. | Window ID Group ID |
| duplicate | Duplicate a window, creating an exact but independent copy. If no window ID is given, all active windows of the current group will be duplicated. | Window ID, optional |
| name | Rename a window. | Window ID Window name |
| remove | Close a window. All unsaved changes will be lost. The window ID is non-optional. To close all windows of the current group use group clear. | Window ID |
Group commands
| Sub Command | Explanation | Arguments |
|---|---|---|
| add | Create and show an empty group. | |
| show | Show a group | Group ID |
| remove | Close a group, including all of the windows in the group. | Group ID, optional: default is the current group |
| clear | Close all windows in a group. | Group ID, optional: default is the current group |
| export | Generate an image from the current group’s active windows. | File name, optional: The default file name depends on the dataset in the first window. The file name’s extension specifies the file format. Time step, optional: Can be cur, all or a custom list. Default is the current time step. 3rd dimension depth, optional: Can be “cur”, “all” or a custom list. Default is the current depth. Resolution (%), optional: Scales the image to use a finer resolution while showing the same content. 200 means double width and height and thus four times as many pixels. Foreground color, optional: Color for text and lines, format must be a hex code like 0xRRGGBB, default is what was last used in an export from within the program. |
| Background color, optional: see foreground color |
Time step commands
All following sub commands need to be prefixed with the “timestep” command. All commands are applied on all active windows of the current group.
| Sub Command | Explanation | Arguments |
|---|---|---|
| next | Show next time step | |
| previous | Show previous time step | |
| first | Show first time step | |
| last | Show last time step | |
| set | Set time step to a specific number. If the number is larger than the amount of available time steps, the last available time step will be shown. | Time step number |
3rd dimension commands
All following sub commands need to be prefixed with the 3d command. All commands are applied on all active windows of the current group.
| Sub Command | Explanation | Arguments |
|---|---|---|
| plane | Define which two axes should be displayed and thus which dimension should be constant. | Orientation: xy, xz or yz |
| next | Move the constant dimension one cell up | |
| previous | Move the constant dimension one cell down | |
| set | Set the constant dimension to a specific number. If the number is larger than the size of the dimension, the last available depth will be shown. | Depth (cells) |
Repetition and mirroring commands
All following sub commands need to be prefixed with the “repeat” command. All commands are applied on all active windows of the current group.
| Sub Command | Explanation | Arguments |
|---|---|---|
| horizontal | Set amount of horizontal repetitions with or without mirroring, allowed values are 1, 2 and 3. | Amount Mirrored, optional: true or false, default is false |
| vertical | Set amount of vertical repetitions with or without mirroring, allowed values are 1, 2 and 3. | Amount Mirrored, optional: true or false, default is false |
Content Commands
All following sub commands need to be prefixed with the “content” command. Most commands are applied on all active windows of the current group if the window ID is optional and ignored.
| Sub Command | Explanation | Arguments |
|---|---|---|
| zoom | Zoom to a certain area by specifying its borders (including). If one of the border values is left blank, the current value will be kept. | Window ID, optional Horizontal minimum (cells), optional Horizontal maximum (cells), optional Vertical minimum (cells), optional Vertical maximum (cells), optional Hide outside cells, optional: true or false, default is false |
| ratio | Modify pixel ratio. The ratio (pixel width) / (pixel height) will be (width ratio) / (height ratio). | Window ID, optional Width ratio Height ratio |
| info | Show statistical properties of a window on the console or store it in a file. The properties can be calculated for the current region or the complete dataset, and for the current time step (Mode single), one value for all time steps (Mode complete) or as one value for every time step (Mode list). | Window ID Region, optional: current or global, default is current Mode, optional: One of single, complete, list, default is single File name, optional: If non name is given the output will be written to the console |
| operation | Set operation of a window. If no dataset ID is specified, the old datasets will be kept. The pair of dataset ID and time step modification can be repeated up to 22 times to define multiple datasets as variables a to w excluding t. | Window ID Operation Dataset ID, optional Time step modification, optional |
| grid | Set comparison grid mode for operations to cell based or scale based. | Window ID, optional Grid mode: cell or scale |
| subpixel | Enable or disable sub pixel rendering. | Window ID, optional Sub pixel rendering: true or false |
| compare | Create a new window and compare two datasets in it. First dataset will be a, second will be b. | First dataset ID Second dataset ID Operation, optional: Default is a-b Time step modification, optional: Default is 0 |
| export | Export windows content as dataset file. It is possible to export the current time step, all time steps or a list of time steps. The file format can be the MICRESS geoF based data format or a binary or ASCII vtk file. For vtk files it is possible to embed multiple datasets in one file. Additional datasets can be specified by adding one or multiple pairs of additional window IDs and data types. The output files can be compressed; whether or not compression is enabled by default depends on the chosen file format. If geometry values are defined, the dataset will be transformed to fit the new geometry. The default transformation algorithm is nearest neighbor but a trilinear algorithm can be enabled. | Window ID File name, optional: Default is based on first dataset in window Time step, optional: cur, all or a list, default is all File format, optional: One of geof, vtk, vtkascii, default is geof Compress file, optional: true or false, default is true for geof and false for both vtks Data type, optional: Default is data type of first dataset in window Current region, optional: true or false, default is false Geometry X, optional Geometry Y, optional Geometry Z, optional Trilinear, optional: true or false, default is false Additional window ID, optional Additional datatype, optional |
Color scale commands
All following sub commands need to be prefixed with the colorscale command. Most commands are applied on all active windows of the current group. The window and dataset ID arguments follow the same rules as described in Writing scripts.
| Sub Command | Explanation | Arguments |
|---|---|---|
| show | Show or hide color scale. | Visible: true or false |
| color | Set color scheme to one of the predefined schemes. Valid values are integer values from 1 to 11. | Color scheme |
| load | Load and use a color scheme from a file. | File name |
| position | Set the color scale to a certain position. | Position: One of left, right, top, bottom, independent |
| flip | Flip color scale. | |
| gap | Set color scale gap. | Gap (pixel) |
| size | Set color scale size. | Size (pixel) |
| range | Set color scale range to a fixed minimum and maximum. This command can be applied to all or one color scale(s). No minimum or maximum value will enable automatic mode. Mixing automatic mode and fixed values is possible. The minimum and maximum values will be calculated from the specified region. | Window ID, optional: Default is all active windows Minimum value, optional: Default is automatic mode Maximum value, optional: Default is automatic mode Region, optional: One of cur, timestep or all, default is cur |
| rectangle | Set color scale range to a fixed minimum and maximum based on the values in a specific region. If one of the rectangles coordinates is left blank it will be set to one (min) or the maximum possible value (max). | Window ID, optional: Default is all active windows Horizontal minimum (cells), optional Horizontal maximum (cells), optional Vertical minimum (cells), optional Vertical maximum (cells), optional |
Length scale commands
All following sub commands need to be prefixed with the lengthscale command. All commands are applied on all active windows of the current group.
| Sub Command | Explanation | Arguments |
|---|---|---|
| show | Show or hide length scale. | Visible: true or false |
| position | Set the length scale to a certain position. | Position: One of horizontal, vertical |
| size | Set length scale size. | Size (pixel) |
| length | Set length scale length. No length means automatic mode. Length is an integer value in micrometer or nanometer, depending on Nanometer. | Length, optional Nanometer, optional: true or false, default is false |
Information box commands
All following sub commands need to be prefixed with the infobox command. All commands are applied on all active windows of the current group.
| Sub Command | Explanation | Arguments |
|---|---|---|
| show | Show or hide information box. | Visible: true or false |
| position | Set the information box to a certain position. | Position: One of left, right, top, bottom |
| size | Set information box size. | Size (pixel) |
| content | Set information box text content | Content: String |
| icon | Show or hide MICRESS icon. | Show: true or false |
Vector commands
All following sub commands need to be prefixed with the vector command. Most commands are applied on all active windows of the current group.
| Sub Command | Explanation | Arguments |
|---|---|---|
| show | Create a new window and show a vector dataset. | Background window ID Horizontal dataset ID Vertical dataset ID |
| grid | Set vector grid size. | Grid size (pixel) |
| cutoff | Set threshold for minimum and maximum vector length. No value means no threshold. | Minimum value, optional Maximum value, optional |
| type | Set visualization type to arrows or lines. | Visualization: One of arrows, lines |
| color | Set visualization color. | Color: Hex code like 0xRRGGBB |
Isoline commands
All following sub commands need to be prefixed with the isoline command. Most commands are applied on all active windows of the current group.
| Sub Command | Explanation | Arguments |
|---|---|---|
| set | Set values for isoline generation. | Value(s): Infinite value arguments possible |
| norm | Set values for isoline generation to n uniformly distributed values reaching from the minimum to the maximum values of the current region. | Value count |
| color | Set color for isoline visualization. It is possible to specify multiple color pairs, up to one for every isoline value. If fewer colors are specified, the first lines will have custom colors and the last lines will have the color of the last specified color. | Inner color: Hex code like 0xRRGGBB Outer color: Hex code like 0xRRGGBB |
| width | Set the width of the isoline visualization. | Width (pixel) |
| timestep | Enable or disable preservation of isolines of different time steps on time step change. | Preserve: true or false |
| transparency | Set background transparency. | Transparency (%) |
| source | Define which dataset should be used for isoline generation in a specific window. If no dataset is specified the visible content (including operations) will be used for generation. | Window ID Dataset ID, optional |
| export | Save isoline contour values in an ASCII file. The export can be done for all or the current time step and for the current region or the complete dataset geometry. | All time steps: true or false Complete dataset: true or false File name |
EDX commands
All following sub commands need to be prefixed with the “edx” command. Most commands are applied on all active windows of the current group.
| Sub Command | Explanation | Arguments |
|---|---|---|
| points | Set X/Y/Z coordinates of EDX points. It is possible to specify an infinite amount of coordinate triples. Invoking this command will delete all previously existing EDX points. | Window ID, optional: No ID means all active windows X Coordinate (cell) Y Coordinate (cell) Z Coordinate (cell) |
| cells | Set cell pointer coordinates of EDX points. It is possible to specify an infinite amount of cell pointers. Invoking this command will delete all previously existing EDX points. | Window ID, optional: No ID means all active windows Cell pointer |
| line | Select a default EDX line. Invoking this command will delete all previously existing EDX points. | Position: One of left, right, top, bottom, horizontal, vertical, ascending, descending |
| show | Show EDX analysis in a graph window. The five available modes are Show line data (line), Show line data over time (linetime), Show point data over time (point), Show value on line over time (value) and Show non-zero values on line over time (nonzero). The time step values can be adjusted in the script, all other values have to be adjusted in the graph window. | Mode: One of line, linetime, point, value Time step (from), optional: Integer number or cur for current, default is cur Time step (to), optional: Integer number or cur for current, default is cur |
| export | Export EDX analysis values as table. For available modes see edx show. The time step values can be adjusted. For the mode value, the value can be set with the Search value attribute. | Mode: One of line, linetime, point, value Time step (from), optional: Integer number or cur for current, default is cur Time step (to), optional: Integer number or cur for current, default is cur Filter value, optinal: If a x-value equals this value, the corresponding cell will not be included in the export. Search value, optional |
Anchor commands
All following sub commands need to be prefixed with the “anchor” command.
| Sub Command | Explanation | Arguments |
|---|---|---|
| add | Add new anchor to a window. If no label coordinates are given the label will be placed close to the head. | Window ID Head X Head Y Label X, optional Label Y, optional |
| move | Move an anchor and its label. If values are unspecified they will not be changed. | Anchor ID Head X, optional Head Y, optional Label X, optional Label Y, optional |
| text | Set an anchor’s text. | Anchor ID Text |
| head | Specify an anchor’s head appearance. | Anchor ID Head: One of arrow, point, plain |
| foreground | Set foreground color (text and lines) and opacity. If only one value is specified the other will stay unmodified. Opacity doesn’t influence the text. | Anchor ID Color, optional: Hex code like 0xRRGGBB Opacity (%), optional |
| background | Set background color and opacity. If only one value is specified the other will stay unmodified. | Anchor ID Color, optional: Hex code like 0xRRGGBB Opacity (%), optional |
| arrow | Show or hide anchor arrow including arrow head. | Anchor ID Visible: true or false |
| border | Show or hide anchor border. | Anchor ID Visible: true or false |
| remove | Remove an anchor. | Anchor ID |